StarRocks, the high-performance real-time OLAP database, was designed to make data-intensive analytics fast and easy. When it comes to speed, it makes good on this promise by delivering query performance 5 to 10 times faster than other popular solutions. It can also perform real-time analytics while simultaneously updating historical records, and recent developments have enabled it to enhance real-time analytics with historical data from data lakes easily.
But what about ease of use? The StarRocks community values flexibility and low maintenance overhead, which is why you'll find it baked into every update. In this article, we'll take a look at one area StarRocks makes easy: deployment.
StarRocks provides many installation methods, but the best way to deploy StarRocks can depend on your specific needs and available technology. In the spirit of StarRocks' commitment to flexibility, we are going to explore four ways to deploy StarRocks and talk about how they compare to each other (with examples!). After reading this blog post, you will learn how different deployment methods compare and which is the best for you!
What We'll Cover
-
Docker: Quick test (pull:starrocks/allin1-ubuntu)
-
A quick test of functionality
-
Not a performance test
-
-
AWS QuickStart Solution: Deploy on AWS
-
Test/performance benchmark
-
Can be a full production deployment with HA
-
Quick deployment on the cloud
-
-
StarRocks Kubernetes Operator: Deploy & manage StarRocks in your Kubernetes environment (pull:starrocks/operator + starrocks/be-ubuntu + starrocks/fe-ubuntu)
-
Test/performance benchmark
-
HA Production-ready
-
-
Bare metal to truly own the full deployment
-
Test/performance benchmark
-
HA Production-ready
-
For environments where automated installation is not available
-
Prerequisites
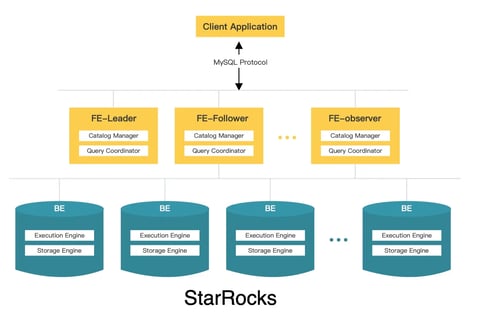
It is highly recommended that you get yourself familiar with StarRocks' architecture before diving into this article. Check out all the StarRocks documentation here. In the meantime, here's a quick overview.
StarRocks has a simple architecture with Frontend (FE) and Backend (BE) nodes:
-
FEs are responsible for metadata management, client connection management, query planning, and query scheduling.
-
BEs are responsible for data storage and SQL execution.
You can read more about them here.
Software used
-
Docker
-
MySQL (used as a client to connect to StarRocks)
Docker: Quick Functionality Test
The first and easiest way of deploying StarRocks is through a docker container.
To get docker, you can visit docker's official documentation here.
Step 1. Deploy StarRocks
To choose a StarRocks version, go to the StarRocks Dockerhub repository and choose a version based on the version tag.
docker run -p 9030:9030 -p 8030:8030 -p 8040:8040 -itd starrocks/allin1-ubuntu
Step 2. Connect to StarRocks
Because the deployment is an asynchronous process, it is recommended to wait for a full minute before connecting to the cluster.
Use the MySQL client to connect to the StarRocks cluster.
mysql -h127.0.0.1 -uroot -P9030
Note: This quickstart deploys one BE. You need to addproperties ("replication_num" = "1")in the CREATE TABLE clause, so only one replica of data is persisted in the BE.
AWS Quickstart (Automated Cloud Installation)
To take things to the next level, and beyond, but retain the simplicity of the cloud, there is the StarRocks on AWS Quick Start solution.
This AWS Quick Start solution is simple enough for quickly spinning up a POC testing environment, while secure enough for some light production use.
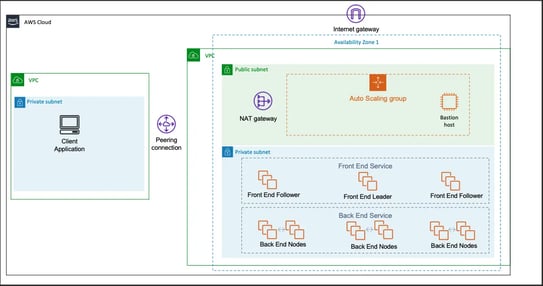
The Quick Start sets up the following:
-
High Availability and distributed StarRocks
-
Front End node(s) for metadata management, client connections, etc.
-
Back End node(s) for data storage and SQL execution
-
-
A Linux bastion host in an auto scaling group (optional)
-
Supports deploying in an existing VPC or in a new VPC
Please refer to the quick start page for more details.
Deployment overview
From an AWS account, you will first launch Quick Start depending on whether you want to use an existing VPC or not.
Note: If you are using an existing VPC, please make sure you have the S3 endpoint configured. See the documentation here.
An AWS CloudFormation console will pre-populate the template with some common options, but feel free to change as needed.
Here we highlight some of the configurations that might be confusing.
|
Parameter
|
Mode (new and/or existing VPC)
|
Description
|
|
Bastion enabled
|
new & existing
|
Whether to include a bastion instance in the public subnet.
|
|
Specified AMI ID (Optional)
|
new & existing
|
Configure if you want to use your own AMI, recommended to keep it as default.
|
|
Root Password of StarRocks (Required) & Confirm Root Password (Required)
|
new & existing
|
This is the password for the StarRocks root user. The password policy allows lowercase and uppercase alphabetical characters and numerals, with a password length within [12, 32].
|
You will be able to review and confirm the template settings before choosing “Create stack” to deploy the stack.
When the status is CREATE_COMPLETE, the Starrocks deployment is ready.
Please review the detailed deployment steps on AWS for more help launching QuickStart. It should take only a few minutes to review, and between 10 to 30 minutes to kick it off.
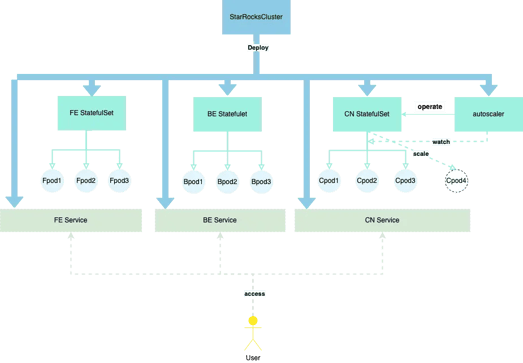
StarRocks Kubernetes Operator: Fully fledged StarRocks on K8s
The StarRocks Kubernetes Operator is a useful tool developed by the StarRocks community. It can help you deploy StarRocks' Front End (FE), Back End (BE), and Compute Node (CN) components into your Kubernetes (K8s) environment with a few simple commands. This deployment method supports deploying any number of FE (at least 1 for FE), BE, and CN nodes in 2 simple steps.
Prerequisites
This guide assumes that you already have a functioning Kubernetes environment at hand. If you do not have one, there are several options that you can choose from:
Quick validation test:
Managed K8s on the public cloud:
Step 1. Install StarRocks' K8s operator
The first step is to install the starrockscluster CRD:
kubectl apply -f https://raw.githubusercontent.com/StarRocks/starrocks-kubernetes-operator/main/deploy/starrocks.com_starrocksclusters.yaml
You can choose to install the operator in the default "starrocks" namespace or in a custom namespace.
Install in the starrocks namespace
By default, the operator is configured to install in the "starrocks" namespace. You can install it through:
kubectl apply -f https://raw.githubusercontent.com/StarRocks/starrocks-kubernetes-operator/main/deploy/operator.yaml
Install in a custom namespace
However, to install the operator in a custom namespace, download the Operator Manifest and change all namespace from "starrocks" to the name of the desired custom namespace.
kubectl apply -f custom-namespace-operator.yaml
Step 2. Deploy StarRocks
You need to prepare a separate yaml file to deploy the StarRocks FE, BE, and CN components. The StarRocks Kubernetes Operator's GitHub repositories contain some examples that can help you get started.
You can modify the example templates or create a new one to better suit your use case. The GitHub repository's README section contains some more information about how to use a configMap to configure the StarRocks cluster as well as how to configure the storage volumes.
For demonstration purposes, we use the starrocks-fe-and-be.yaml example template to start a 3 FE and 3 BE StarRocks cluster. You can edit the YAML file to change the number of FE (to 1) or BE to other numbers.
wget https://raw.githubusercontent.com/StarRocks/starrocks-kubernetes-operator/main/examples/starrocks/starrocks-fe-and-be.yaml

kubectl apply -f starrocks-fe-and-be.yaml
Step 3. Connect to the StarRocks Cluster
From within the Kubernetes cluster
After deploying the StarRocks cluster, you can use kubectl get svc -n <namespace> to find the IP to connect to. For example, if the namespace that Starrocks is deployed into is namespace starrocks, you can:
kubectl get svc -n starrocks
<your-StarRocksCluster-name>-fe-service's clusterIP is the IP to use to connect to StarRocks FE.
Then you can use the following command to access your newly created StarRocks cluster.
mysql -h <FE-IP> -P9030 -urooot
From outside of the Kubernetes cluster
If you are accessing outside of the Kubernetes network, you will need to change the service type to LoadBalancer. You can use the following command to configure:
kubectl -n starrocks edit src starrockscluster-sample
Add the service field:
starRocksFeSpec:
image: starrocks/fe-ubuntu:x.x.x
replicas: 3
requests:
cpu: 4
memory: 16Gi
service:
type: LoadBalancer ## change to LoadBalancer
Then you can use kubectl get svc -n <namespace> to find the IP to connect to. For example, if the namespace that starrocks is deployed into is namespace starrocks, you can:
kubectl get svc -n starrocks
<your-StarRocksCluster-name>-fe-service's ExternalIP is the IP to use to connect to StarRocks FE.
Then you can use the following command to access your newly created StarRocks cluster.
mysql -h <FE-IP> -P9030 -urooot
Manual Installation: Fully-Fledged StarRocks on Your VMs
The simple architecture of StarRocks makes for a simple deployment. Installing and establishing a StarRocks cluster is not hard, but it is manual.
Prerequisites
This installation procedure will work no matter how many nodes you set up. We suggest that for production you set up three FE nodes and three BE nodes as a minimum, but for investigation and PoCs where high availability (HA) is not required but performance is, you can just use one FE.
We assume that you have on each of the nodes:
-
Centos 7 (or some variant such as RedHat, Oracle, or AWS Linux)*
-
Java 8 JDK is installed with JAVA_HOME set
With the default FE and BE configuration files (fe.conf and be.conf), you need to make sure the ports are open and not used.
You will also need to make sure that the following ports are open on the FE nodes:
-
HTTP: 8030
-
Thrift server: 9020
-
MySQL: 9030
-
FE coordination/control: 9010
And the following ports need to be opened on the BE nodes:
-
HTTP: 8040
-
Thrift server: 9060
-
Heartbeat: 9050
-
BRPC: 8060
However, you can always go in and modify the fe.conf and be.conf to assign different ports for StarRocks to use.
Single FE deployment
First, we want to spin up a single FE node StarRocks deployment.
The StarRocks documentation page already covers this topic well. You can refer to the steps here.
Add an additional FE for a fully-fledged HA deployment

To avoid a single point of failure for FE nodes, we need to deploy multiple replications of FE nodes to ensure HA. Multiple FEs use the raft-like BDBJE protocol to complete leader selection, log replication, and failover.
On how to add multiple FEs to a StarRocks deployment, please visit the StarRocks documentation page.
You're Now Ready to Deploy StarRocks
In this article, we have demonstrated four simple ways to deploy StarRocks, and how to choose the most appropriate deployment method for your own use case. All that's left is for you to experience how easy this is for yourself. So download the latest version of StarRocks, join our Slack community and see why more and more people are making the jump to StarRocks.